Did you know that garlic is a natural antibiotic and offers several health benefits? Indeed, it is known to strengthen the immune system, fight against bacteria, and act as an anticoagulant. In addition, garlic is part of the category of so-called “umami” foods, that is to say, which has a flavor that lingers in the mouth (and which makes many people salivate). Whether cooked or raw, it enhances the taste of many everyday dishes. It is not surprising that we want to grow garlic at home to benefit from its virtues and its succulent assets. We therefore invite you to discover all the secrets of a successful garlic plantation which will allow you to harvest a ton of delicious bulbs.

INTERESTING FACT!
Do you know black garlic? Very trendy and above all very popular with great chefs, its taste is sweeter and tangier, but just as delicious and its soft texture is similar to that of candied fruit. Black garlic is none other than the result of a long process of maturation of white garlic cloves. The garlic heads are first browned at low temperature for four to six weeks, in a closed place at a specific temperature and humidity level. They are then left to dry for several months. The quality of black garlic will mainly depend on the duration of aging and the quality of the maturation conditions.
When to plant garlic: in fall or spring?
You should know that garlic is a perennial plant that is grown as an annual. Simply plant cloves, also called garlic cloves, in the fall (from mid-September to the end of October) to harvest the bulbs the following summer.
Planting garlic in the fall allows the bulbs to develop a good root system just before winter. This corresponds to its natural growth cycle and ensures a strong start the following spring.
Although planting in the fall is the best option, it is also possible to plant garlic very early in the spring. However, the pods must be planted in April or May at the latest, otherwise, you risk delaying the growth of the bulbs and your plants will not have time to produce enough foliage before the solstice.
Where to plant garlic?
- In a location facing the full sun.
- In a place sheltered from the wind.
- In fertile, well-drained soil, too high a humidity level or stagnant water risks rotting the pods and bulbs.
Tips for successfully planting garlic
In autumn :
1. Choose the bulbs

The first thing to do is to select quality garlic bulbs. You can opt for bulbs that you have grown yourself or obtain varieties from public markets, garden centers, or local growers. It is best to avoid planting garlic purchased from a grocery store since these bulbs may have been treated to prevent germination during storage. Also choose large, healthy bulbs (firm and without spots or diseases) to ensure an equally productive harvest.
2. Prepare the ground
Start by adding a generous amount of Compost Biosol to the existing soil to encourage root development and enrich the soil. Form small mounds of soil about 15 cm (6 in) high to promote drainage and prevent the bulbs from rotting.
3. Plant the pods

Carefully remove the cloves, taking care not to damage the base (where they attach to the head of garlic). If the base is damaged, the garlic will unfortunately not grow.
Plant each pod separately in a hole between 5 and 7.5 cm (2 to 3 in) deep, taking care to position the tip upwards. Leave a space of 10 to 15 cm (6 to 8 in) between each of them and a space of 35 to 45 cm (15 to 18 in) between the rows.
4. Cover with cedar mulch
Apply 7 to 10 cm (3 to 4 in) of mulch to your garlic plantation after the first frost to ensure good winter protection.
5. Avoid overwatering
There is no need for water when planting. Newly planted pods usually make do with the moisture in the soil during the winter. Excessive watering could cause them to rot.
In spring :
1. Remove the mulch
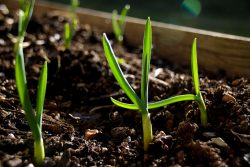
From mid-March to mid-April, young shoots appear. Now is the time to remove the mulch so that the soil warms up.
2. Water

When the snow melts, it is necessary to prevent water from accumulating around the garlic plants. You can therefore dig small trenches to allow good drainage.
During foliage growth in May and June, garlic should not lack water. You will therefore need to water regularly if there is no rain. It will then be necessary to gradually reduce watering as temperatures rise to encourage the ripening of the garlic heads. Stop watering completely once the stems begin to bend.
3. Fertilize
When temperatures warm, add to the base of plants to encourage vigorous growth. Reapply it every three to four weeks. Stop fertilizing around mid-July so as not to harm the conservation of the bulbs.
And the garlic flower in all this?
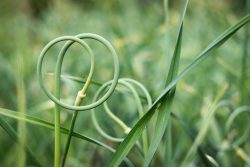
In mid-June, the foliage stops growing and gives way to magnificent curly stems accompanied by small flower buds called garlic flowers. This is when the first phase of the harvest begins. Two choices are available to you:
- Let the stems turn yellow and tie them
Tying the stems stops their development and concentrates the sap in the bulbs to optimize their growth.
- Cut the stems to add them to your recipes.
We cut the garlic flower towards the end of June when the stems are still tender and have turned twice on themselves. Of course, you can also cut it off when it’s only done one turn, but if you wait a bit, you’ll get more bang for your buck! To harvest it, simply cut it just before the leaves start, at the base of its stem. If you wait too long, in July, the garlic flower will be tougher and therefore less pleasant to eat.
The garlic scape is easier to digest than the cloves and its taste is much more delicate. Consumption of garlic flowers is comparable to that of a vegetable. It can therefore be eaten raw, steamed, sautéed, in pesto or even frozen.
When and how to harvest garlic bulbs?
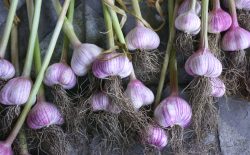
At the end of July, four to five weeks after harvesting the garlic scapes, when half of the lower leaves have yellowed, but the upper ones are still green, harvest the bulbs carefully using a spade or simply with your hands. Then remove the excess soil, then hang or store the plants on a wire mesh in a dry, well-ventilated place protected from the sun. Let them dry for three to four weeks. Once the drying period is over, cut the stems 5 to 7 cm (2 to 3 in) above the bulb as well as the roots. Finally, place your harvest in a dark, ventilated place and it will keep for several months.