3 techniques for overwintering geraniums
Did you know plants sold in garden centers named geranium are garden pelargoniums? Geraniums are hardy and, therefore tolerate the cold, and they have regular, round flowers while pelargoniums are annuals, fear frost, and their flowers are irregular, symmetrical vertically. Geraniums are generally more trailing and pelargoniums have an upright habit.
Sold as annuals in most garden centers, geraniums (pelargoniums) are found in large quantities in flower beds, flower pots, and flower planters. Its beautiful single or double flowers, in shades of white, red, and pink, add color to any floral creation. Geranium does not tolerate frost; we might think we should put it in the compost once the summer season is over. But it is possible to keep your geraniums during the winter to reuse them when nice weather returns.
Three techniques are possible:
1. Bring your geranium indoors
This method is the easiest of all. Bring your geranium in before the first frost and treat it like a houseplant throughout the winter. On the edge of the sunniest window in the house, it will spend a few months warm and even produce flowers, less than outside, but still! To do this :
- Dig up your geranium and clean it with an insecticidal soap that you can find at a garden center to prevent insects from entering the house;
- Remove all flowers, flower buds, and wilted or yellowed leaves;
- Place your plant in a sunny window and water when the soil is dry to the touch.
2. Take cuttings
In September, it is possible to take cuttings from geraniums to create new plants from your current plants before they die back. To compensate for any losses, take about a third more stem than the number of cuttings desired.
Here’s how to do it:
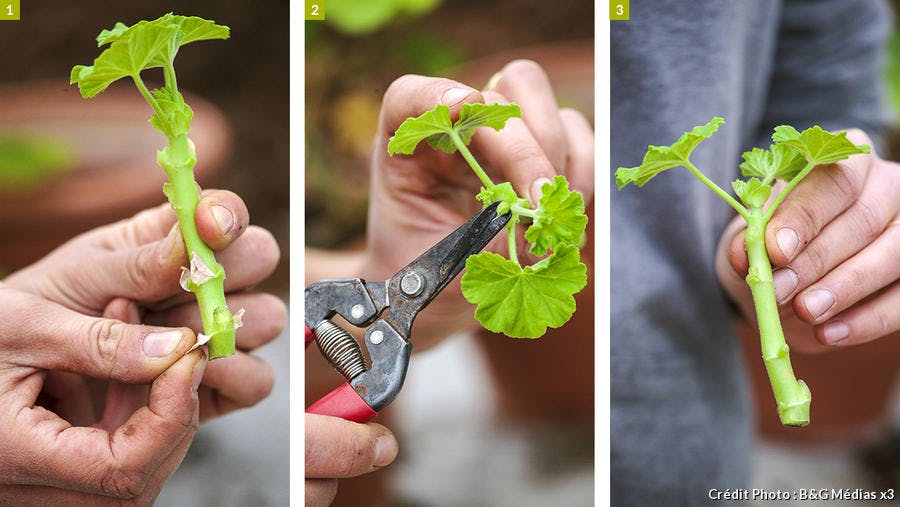
- Choose green, young, and vigorous stems. Older ones that are starting to become woody should be avoided.
- Cut the stems between two nodes, this is where new roots will form.
- Remove all flowers, flower buds, and bottom leaves and pinch (cut) the end of the cutting to stimulate branching and have full plants.
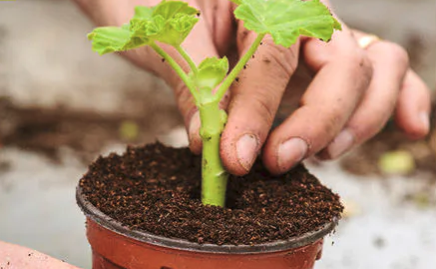
- Plant the cuttings in the Soil for Seedlings and Sprouts. Make a hole with a pencil and insert your cutting into it. The more nodes buried in the potting soil, the better chance your cutting will root.
- Place your cuttings in a warm, well-lit area such as a windowsill, avoiding direct sunlight. Keep the soil barely damp at all times and avoid using a plastic dome.
- After 4 to 8 weeks, you should see young leaves appear. This is a sign that the cutting is well-rooted. At this time, transplant your geranium into a larger pot and place it in front of a sunnier window. You can then maintain it as you do indoor plants.
3. Put Geraniums to Dormancy
This technique is more complex and you should expect to have losses. Dormancy is not natural for geraniums, so it must be forced.
- Dig up the plant and shake it lightly to remove excess soil;
- Remove all flowers, flower buds, and wilted leaves;
- Place your plants in a cardboard box or paper bag so that they are protected from light and let them dry completely;
- Store in an unheated (around 5 degrees) and humid place such as a garage or root cellar. Many have tried the basement, but it is not cool enough and often too dry;
- If you notice that there is mold, remove the problem leaves and return your plant to darkness;
- In March, bring your geranium out of dormancy by planting it in Connaisseur Potting Soil for Houseplants, then grow it as is until warm weather returns and it’s time to bring it back to life. the exterior.
PRO TIP: Acclimate your plants before taking them out
Regardless of the technique used, you must prepare your geranium for its return outside. In March, when the days start to get longer, fertilize your geranium with an all-purpose fertilizer.
When the risk of frost has passed, you can begin acclimatizing your plant outdoors. Take it out first in the shade and sheltered from the wind for a few days, then in partial shade for a few more days before installing it in its final location to avoid sunburn and too much stress.